In recent years, cameras have begun to become much more powerful in many ways. With new features arising that were only seen in high-profile professional cameras are now accessible in consumer cameras.
One of those features is 10-bit+ video recording. Due to the processing power needed to capture 4K upwards, 10-Bit colors, higher frame-rates etc. it has taken quite some time for consumer camera to film in 10-bit color depth. Now processors and modern cameras can pack a huge punch in such a small body.
Many camera featuring 10-bit available today are Fujifilm XT3, Blackmagic Pocket Cameras, Atomos Recorders and much more.
How to export 10-Bit videos from Adobe Premiere Pro CC:


There are 2 ways we know of where you can render 10-Bit videos direct from Premiere Pro.
- Prores 4:2:2 YUV Uncompressed 10-Bit
- GoPro CineForm YUV 10-Bit
Which one do I use?
These two ways offer different file sizes. Prores saves much more data than GoPro CineForm. GoPro CineForm is a more compressed version.
One thing you should be aware of is Prores is mostly only used for editing with. As it's an uncompressed and efficient codec for editing software to read and utilize, the file size tends to be huge. But this makes the editing process much easier and you have all the quality from the video.
When you are rendering a final version of your video for online streaming, then you don't want to render in Prores, you will want to render in a compressed file type instead that supports 10-Bit. This is where GoPro CineForm comes in.
Our Test Results:
We tested rendering the exact same project in both of these file types. The results for file size are below.
| File Type | Length | Resolution | File Size |
|---|---|---|---|
| GoPro CineForm 10-Bit | 40 Seconds | 4.5K | 2GB |
| Prores Uncompressed 4:2:2 10-Bit | 40 Seconds | 4.5K | 26.2GB |
So if you are going to send the footage to an editor or edit it yourself we would suggest to use Prores Uncompressed. If you are streaming then use GoPro CineForm 10-Bit.
How to render in Prores 4:2:2 YUV Uncompressed 10-Bit
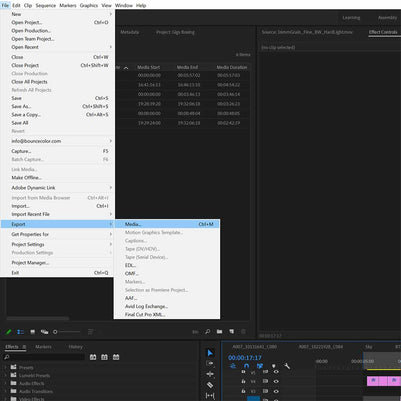
1. First you will need to go to your export window: File - Export - Media…
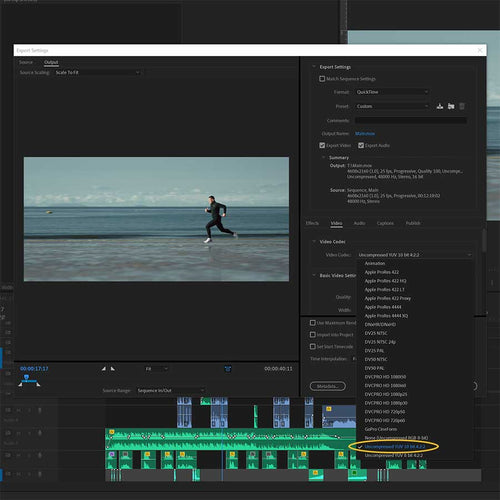
2. Once your window is open, go to your export settings in the top right of the window and change the 'Format' to 'Quicktime'.
3. Where it says 'Preset' click on this and then select 'Custom'.
4. Scroll down to the 'Video Codec' section. Click on this and select 'Uncompressed YUV 10 bit 4:2:2' as shown below.
5. All you need to do now is make sure your project settings are correct like resolution, frame-rate etc. and then render your video out.
How to Render GoPro CineForm 10-bit Video
1. First you will need to go to your export window: File - Export - Media…

2. Once your window is open, go to your export settings in the top right of the window and change the 'Format' to 'Quicktime'.
3. Where it says 'Preset' click on this and then select 'Custom'.
4. Scroll down to the 'Video Codec' section. Click on this and select 'GoPro CineForm' as shown below.
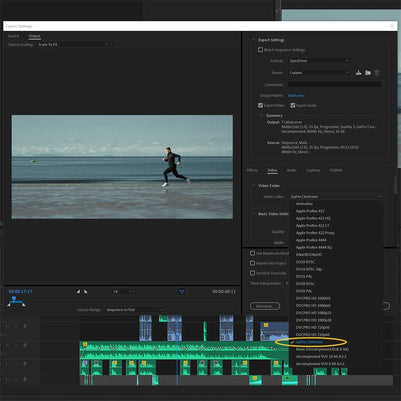
5. Scroll down to where it says 'Render at Maximum Depth' and make sure this is ticked. Then also make sure the 'YUV 10 bpc' option is selected as shown below.
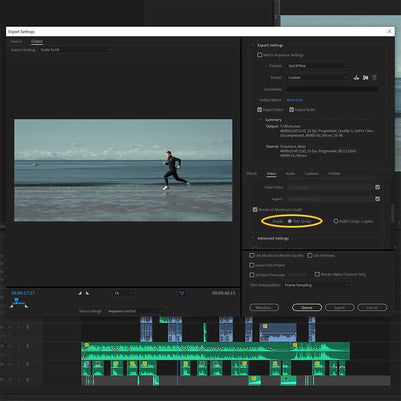
6. All you need to do now is make sure your project settings are correct like resolution, frame-rate etc. and then render your video out.
How to Export 10-Bit in After Effects

With After Effects, go to your export window and follow the exact same process as Premiere Pro.
How to Export 10-Bit in Media Encoder
Again, Media Encoder uses the exact same process as Premiere Pro in the settings above.


